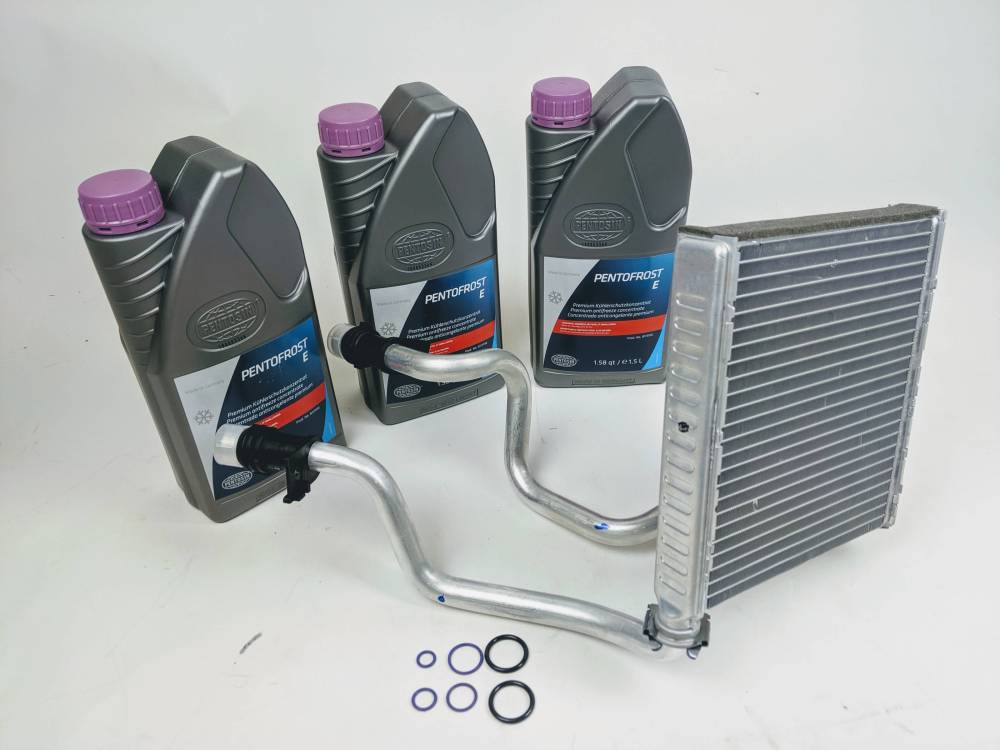
MK5/6 heater core kit
MK5/6 heater cores clog and result in poor heater performance. If the vehicle gets up to, and stays at 190-200F, without overheating issues, yet the heater doesn't work well, heater core clogging is a viable possibility. This kit contains all necessary parts for a successful replacement.
Kit contents:
Qty 1 - HEATER CORE - OEM MANUFACTURER
Qty 1 - HEATER CORE SEAL AND CLAMP KIT
Qty 3 - G13 COOLANT
Qty 2 - O-RING FOR QUICK CONNECT HEATER HOUSE COUPLERS AT THE FIREWALL
Installation:
Removal of the heater core actually spills very little coolant. However we recommend a cooling flush prior to beginning core replacement.
That said, heater cores clog due to coolant age and contamination. Begin procedure by draining as much coolant as possible from the radiator and accessible oil cooler hose. Reattach hoses. Fill with clean water, distilled is best. Drive approximately 15 minutes. Drain & repeat until water drained from coolant system is clear.
The heater core is actually rather straightforward to replace.
Allow engine to cool.
Remove turbo inlet pipe, PCV pipe, and airbox.
Begin by detaching the engine side heater hoses from the fire wall. Retract the clip, wiggle couplers, lube with WD40, and pull towards engine firmly. Replace o-rings inside couplers using supplied M3x22 o-rings.
Remove small screw with 6mm head nestled between heater core pipes on firewall. This allows the pipes to move a bit inside car.
Access heater core from left footwell. (Right hand drive may be different.) Remove plastic trim above pedals and trim at base of forward console on left side of console. Upper trim pulls down then out after 2 T20 screws are removed. Left console trim is removed by removing T20 screw, then pulling downward at rear edge, then back with complete assembly.
Remove heater core compartment cover. 3 screws, 6mm head.
Remove heater core pipe to heater core v-band clamps. 3mm allen head.
Carefully rotate heater core pipes back and forth. These are thin-wall aluminium pipes. Gentle plier work is okay, though take care not to crush pipes or damage sealing flange.
Slide pipes forward & out of heater core.
Lower footwell duct. This is plastic and will flex. It is not necessary to remove this part from the car. Doing so is fine, but requires more trim disassembly.
Slide heater core out of it's box.
Install new foam insulation onto new heater core. Use old heater core as reference.
Install new heater core seals into heater core. Lube lightly with liquid soap.
Slide heater core into place. Slide pipes into core.
Align flanges squarely. A helper may assist by pushing the heater core pipes rearward from the engine compartment. Snap clamps around heater core flanges and pipe flanges. Install screws & sung.
Lube heater pipe couplers with dish soap prior to snapping them into place. Reassemble balance of engine compartment side components.
If a pressure tester is available, pressure test coolant system to ensure system doesn't leak.
Reassemble duct, cover, and trim.
Fill with coolant and enjoy your heater!