80% Kit
This kit increases the factory 20% anti-torque steer effect to 80%. The 80% Pelolok kit helps eliminate torque steer and inside wheel spin.
The 020 80% Pelolok kit can be installed without removing the transaxle. It will also work with the Peloquin differential, as well as the stock factory differential. This kit is for the 1984 and up 020 transmissions and will work in some V.W. Automatics, such as the 010 3-speed and 01M 4-speed.
Please note: The 80% kit will not work with automobiles with cable shifters.
For the late Automatics such as the 01M, we will require a complete VIN number to verify the fit.
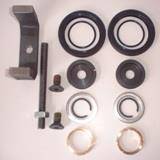
The 80 % kit includes a 10MMx1.5 CV flange tool, 2 CV flange seals, 2 C clips, 2 80% brass shims, 2 thrust washers, 2 steel puck seals with O-rings, and 2 10mm retaining bolts.
Please note: This kit is recommended for 020 transaxles with 100mm CV flanges, if you have 90mm CVs contact Gary for information.
Gary sums up customers' reactions: "The first reaction is that people really notice the difference in the steering response under power. The car steers tighter - on the throttle, the car goes toward the apex. The people who live in the snow and the ice really love the added winter traction".
This kit is great for those with a limited budget or race classes that do not allow a full limited slip differential.
Installation Instructions
These kits should be installed in a good working transmission. They are not designed to correct existing problems. Repair any deficiencies before installing the kit. Before beginning it is recommended that the repair manual be consulted for transmission configuration and parts familiarization.
1. Support the car in a secure position with the front wheels removed.
2. Disconnect both left and right CVs from the transaxle using an 8mm 12 point socket. It is possible to install the kit with only the inner CV removed. To increase access, the axle assembly can be removed entirely by removing the outer axle nut. Before placing the car on the jack stand, loosen the outer axle nut. Once the car is supported, remove the 3 bolts securing the ball joint then the entire axle assembly can be removed. Alignment should be checked later as the ball joint removal may change camber settings.
3. Remove excess grease from the drive flange and remove the rubber cap (seal) with a screwdriver.
4. Install the lOmm stud from the flange tool into the differential shaft. Examine threads prior to threading the bolt to verify the condition of the threads. If necessary clean with tap, slip the clamp over the stud, and install the nut. Tighten to keep pressure applied to the flange. The flange is under pressure from the spring and could come off with force if not properly removed.
5. Remove the snap ring and discard (new ring supplied).
6. Remove the flange tool. Save the concave washer if the 40% kit is being installed. It is not used on the 80% kit.
7. The flange has a spring and spring seat. Clean and set these aside.
8. The factory brass ring is now visible, it is one piece but most likely broken into two pieces. Remove it from the shaft as it will not be reused.
(It may be easier to remove with the seal in step 9.)
9. Remove the flange seal being careful not to damage the seal retaining surface.
10. Install the new lock ring with a 45-degree surface toward the differential. The flange spring seat may aid in installation. With the lock seated, place the thrust washer over the shaft. It can be held in place with a thin layer of assembly lube or grease, or install a washer between the spring and the spring seat.
11. Install a new seal. Place a thin film of grease on the O.D. and the l.D. Tap in using a flat round plate. With the seal in place, verify that the thrust washer is still in place.
12. Do not install a concave washer, install a snap ring only and remove the tool.
13. Install an O-ring on the cap. Clean threads in the differential shaft and place a small amount of red Loctite on threads of the differential shaft (the bolt has Loctite applied). Install cap assembly and torque 33-35 ft/lbs. (Cap can be held by placing 2-8mm bolts in the flange and securing them from rotation by using a screwdriver across the bolts.) Install the cvs as usual.
NOTE: If using my full LSD don't install the thrust washer. My differential is machined so there is no need for this washer.
The kit fits mostly older cars (020 TRANSAXLE) and some Mk4s with automatic transmission depending on VIN.